Tasmota
Tasmota is a opensource platform.The Tasmota created the readymade binary files or firmware for the ESP based products like sonoff devices. The Tasmota is very easy to operate. If someone does not have any experience of coding, he can also create the Esp chip Based product very easily. The pre-compiled and pre-built code can be flashed into ESP device.The device can be configured using webUI.The tasmota has support for various sensor like temperature sensor like DH11 or humidity sensors etc. Further the device can be controlled through HTTP,MQTT,Webui and serially.So creating the product for the Home Automation is very easy. To start working with it ,visit Tasmota Getting started webpage.
ESP32-Cam
ESP32 cam is a ESP32-S2 series based camera supporting module.Generally the ESP32-Cam modules available modules are developed by I-Thinker which is china based company. The ESP32-Cam module comes with camera OV2640 module which is 2Mpixel resolution.The Tasmota ESP32-CAM resolution is 2Mpixel.The board comes with connector to the camera. The board has some free IO ports which are mode available for the user on the headers lying on the either side.The Board has LED which is very bright and connected GPIO pin 4.It has got the SD card slot which is provision for SD card for saving the captured images.
ESP32-CAM
ESP32-CAM board Pins on the Board-1
ESP32-CAM board Pins on the Board-1
Preparing ESP32-Cam Board for Flashing the code
As it can be seen from the images above, the ESP32-Cam board does not have any usb port to flash the code.So flash the coe or hex file is flashed using the serial port.The image given below shows the connections for putting ESP32-Cam board into programming mode..Note that, for programming mode, the GPIO0 pin of ESP32 is connected to the Ground pin. After flashing of the code is over, the GPIO0 pin should be disconnected from the Ground pin.
ESP32-CAM Programming mode.
In the image above ,note that 5V is supplied from external 5V DC Source.
Flashing the Tasmota code into ESP32-CAM
The the appropriate binary file for ESP32-Cam board can be found at this "
ota.tasmota.com/tasmota32/release/".After choosing the appropriate binary file,download it using the flash code downloading tools like webinstaller,tasmotizer,esptools and ESP-FLASHER.
In this article, we will using the webinstaller tool to flash the binary file into the ESP32-cam board.
To flash the code follow the steps as given below,
1. From the Tasmota getting stated page go to flashing part, Select webinstaller. Choose the ESPcam binary file from option 2 as shown the image and click on Connect button.(Preferably use google Chrome Browser).
2. The tool will ask to choose the Comm or serial port connected to the ESP32-Cam board. Select the serial port and click on connect button.
3.After this pop-up will come where select INSTALL TASMOTA32 WEBCAM as shown in the image below.
4.Next select option erase then go for installation.
5. After the installation is complete remove jumper between GND pin ,
6. The ESP32-cam will act as tasmota server,Check the wifi network of your PC to check tasmota device is available for connecting. Connect with the Tasmota device.
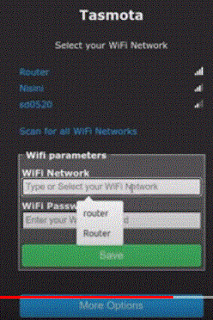
7. Enter the IP 192.168.3.1 in the browser to get the page as shown below.Set the wi-fi SSID and password of your network and click on save.
8.Now the ESP32-CAM will get conneted with your Router and will get directed to the new Tasmota main Menu page.
.In the main menu page,see the camera is working and image stream is available.
9.To configure to LED pin click on Configuration and go the config Module page and select GPOI4 pin as Relay and save the configuration.Then teh Toggle button will get added to the main menu page after the device restarts.The Led can be operated using Toggle button.
More Details about how to setup Tasmota On ESP32-CAM is available on you tube video
here


